Open robotics with Arduino
10 hours
Keywords
-
Arduino
-
Open-source
-
Software
-
Hardware
-
Projects
-
Programmation
-
Coding
-
DIY
-
Science
Learning Objectives
- To make a trainer completely autonomous, and able to learn by himself
- The use of an online version as well as the use of community sites is necessary for information sharing. Thus, in addition to training, trainers will be able to help the community themselves. The trainers themselves will learn how to use projects to modify them as they see fit
Materials
- Personal computer (smartph0one or tablet connected to the internet)
- Internet connexion
- Arduino Board (kit)
Introduction
Arduino is an open-source hardware and software company, project and user community that designs and manufactures single-board microcontrollers and microcontroller kits for building digital devices. Its products are licensed under the GNU Lesser General Public License (LGPL) or the GNU General Public License (GPL), permitting the manufacture of Arduino boards and software distribution by anyone. Arduino boards are available commercially in preassembled form or as do-it-yourself (DIY) kits. The Open-AE Project, which is aimed at promoting FLOSS technologies in non-formal adult education to support the digital upskilling of both educators and learners. We must agree that nowadays digital tools are everywhere and we are entering a DIY era, which means everyone wants to create and not only use technology.
Arduino is present at many degrees. You can use it as a kid, with basics projects very simple to realize. It’s already used as an extraccuricular activity in many Brussels secondary schools. Arduino is also used by university students as a main project in their cursus. Moreover, thanks to the internet and the community, you can, as an adult, carry out projects easily at home and as a self-taught person. In conclusion, Arduino can be used at almost any age, and almost anywhere. It doesn't require a deep knowledge of computers, and has a strong community ready to help at any time, and thousands of tutorials to understand the world of programming and robotics.
Context
The goal of the session is to practically demonstrate and engage learners on how:
- The aim of the sessions will be to make a trainer completely autonomous, and able to learn by himself.
- The use of an online version as well as the use of community sites is necessary for information sharing. Thus, in addition to training, trainers will be able to help the community themselves. The trainers themselves will learn how to use projects to modify them as they see fit.
At the end of the sessions participants will be able to create, program and share material. Learning Arduino can help users learn to think outside the box, reason systematically and work collaboratively.
Sessions
First session: How is Arduino revolutionizing the world of electronics?
Arduino is very easily accessible to all types of audiences, from children to adults. Its simplified programming language, the affordable motherboard and its strong community offer very high accessibility. Arduino allows almost everyone to free themselves from the world of the "digital divide", i.e. the use of electronic devices without knowing how they were built or programmed. It is therefore possible to recreate either a thermometer, a distance sensor, etc... At the slightest touch and customized. Arduino is much based around projects shared on a large scale by the community. First of all, at the beginning of the session, the trainer will ask the participants if they know what Arduino is, and if so, to give all the elements that could come close or far to what Arduino is. Then, the trainer will ask the participants, after explaining at length what an Arduino is, how they could make life easier with a few small projects. At the end of the session, participants should be able to identify an Arduino alternative to all existing electronic devices, should also have a small list of projects they would like to realize.
Second session: Learning the logic of programming
When people want to get into coding, they often run into the problem of programming logic. All the terms as if... so, loops, integrations, are very complex terms that are inherent in every language. So it is important to think about an inclusive and easy way to get into the complicated world of programming. To do this, we need to popularize as much as possible by taking physical examples and real-life situations, and that's what we'll have to do as we go along. The aim of the session will be that each person will be able to give an example of a programming concept (as if... then), comparing it with a real life situation.
Third session: Carrying out Arduino projects through self-training
For the participants, it is essential to learn how to document themselves because even hundreds of hours of classes will not be enough to exploit all that Arduino has to offer. During the session, participants will learn how to use, on sites, projects left by the community. Each group will then choose the not too complicated projects that they will have searched for themselves. The aim of this session is that at the end, each participant will be able to carry out a simple project using a reliable and well-documented site, as well as being able to modify parameters, add or remove modules in order to go further in empiricism and self-learning.
Presentation
-
How is Arduino revolutionizing the world of electronics?
Learning Objectives
- Discover the background of Arduino and its history, and its close link with Open Source in general
- Examine the possibilities offered by Arduino in terms of life enhancement
Introduction
For about thirty minutes, the participants will be divided into groups of two, and will be asked, without using the internet at first, to name everything that is close or far from Arduino. Afterwards, the trainer will explain what Arduino consists of and what are the fields of application.
Discover the world of Arduino
Who Invented the Arduino?
The Arduino project was started at the Interaction Design Institute Ivrea (IDII) in Ivrea, Italy. The project goal was to create simple, low cost tools for creating digital projects by non-engineers, because it was difficult for students to afford expensive motherboards.The beginning project as called Wiring, and it was a development platform. The Wiring platform consisted of a printed circuit board (PCB) with an ATmega168 microcontroller (this is a microcontroller who has memory storage to launch programs), an IDE based on Processing and library functions to easily program the microcontroller.
After a few months, the italians students decided to rename the Wiring project by Arduino project. Not because of the name remembering hardware for Arduino, but because of the bar the students were used to meet at to talk about the project himself. The initial Arduino core team consisted of Massimo Banzi, David Cuartielles, Tom Igoe, Gianluca Martino, and David Mellis.
Why Arduino ?
Thanks to its simple and accessible user experience, Arduino has been used in thousands of different projects and applications. The Arduino software is easy-to-use for beginners, yet flexible enough for advanced users. It runs on Mac, Windows, and Linux. Teachers and students use it to build low cost scientific instruments. Plus, Arduino has a improving community all around the world with mutiples sites like Instructables or Arduino himself.The software and the board get updated very often, and the community is numerous and pretty active.
It’s very cheap: Arduino boards are relatively inexpensive compared to other microcontroller platforms. You can also buy kit for less than 50€. This contains multiples addons as sensors, buttons and a few chipsets. It’s crossplatform: The Arduino Software (IDE) runs on Windows, Macintosh OSX, and Linux operating systems. Most microcontroller systems are limited to Windows. It’s easy to use: The programmationlangage is the easiest one, and you only have to download the IDE to start programming. You can also extend the programmationlangage to C++ and add multiples librairies.
What is an Arduino board?
Arduino boards are thus composed of a motherboard with a processor and random access memory. It is a small computer capable of using a variety of microprocessors and controllers. The boards are equipped with sets of digital and analog input/output (I/O) pins that may be interfaced to various expansion boards ('shields') or breadboards (For prototyping) and other circuits. The boards feature serial communications interfaces, including Universal Serial Bus (USB) on some models, which are also used for loading programs from personal computers.
The basic Arduino card is called the Arduino Uno, but there are a bunch of other Arduino cards, such as the Arduino Mega, which offers a much more powerful processor, as well as more digital and analog inputs and outputs. There is the Arudino nano, which for almost the same power of the microcontroller, is much smaller in size. Arduino Mini, Arduino Due, Arduino ADK Android, so many Arduino cards that can meet the specific needs of each project.
Also note that as Arduino is an open-source hardware and software, many other similar cards of different qualities have appeared on the market, and it is therefore very easy to get them at lower prices, as for the brand Elegoo, Seeedstudio, Sparkfun, Watterott. These other brands, which sometimes collaborate with Arduino, can offer specific modules, such as a card with integrated wifi, a card specially made to communicate with a web server, etc.
Homework
Participants will have as homework to go on the internet and look for a project they might like, and learn about the code as well as the connections. They will have to explain the project and how it could be useful in their everyday life, as well as the modifications they could make to make the project more adapted to their requests.
References
- Arduino.
- TOP 10 Arduino projects of 2019 Scratch website.
- Wikipedia: Arduino.
-
Learning the logic of programming
Learning Objectives
- Discover the benefits of programmation for the development of 21st Century skills
- Design a program
- Learn autonomous from tutorial and videos
- Access almost any programming language
Introduction
Group discussion on “Coding with Arduino?” Trainer will start the introduction to the module by asking participants about their programming language experience.
Let’s popularize programmation
“Digital fluency requires not just the ability to chat, browse, and interact but also the ability to design, create, and invent with new media” (…). The ability to program provides important benefits. Inparticular, programming supports “computational thinking,” helping you learn important problem-solving and design strategies that carry over to no programming domains. Presentation and analysis of the benefits of programming.
It is essential to learn programming and compare its concepts to real-life situations. The trainer should popularize these concepts as much as possible, as with unplugged activities.
An example could be the robot sandwich: The teacher plays the robot and the participants have 10 minutes to tell the robot how to make a chocolate sandwich by writing all the instructions on paper. It is important that the robot does absolutely what the instruction says, and that it does not get it wrong. The goal is to show at which points the lines of code must be accurate, complete, and in the correct order.
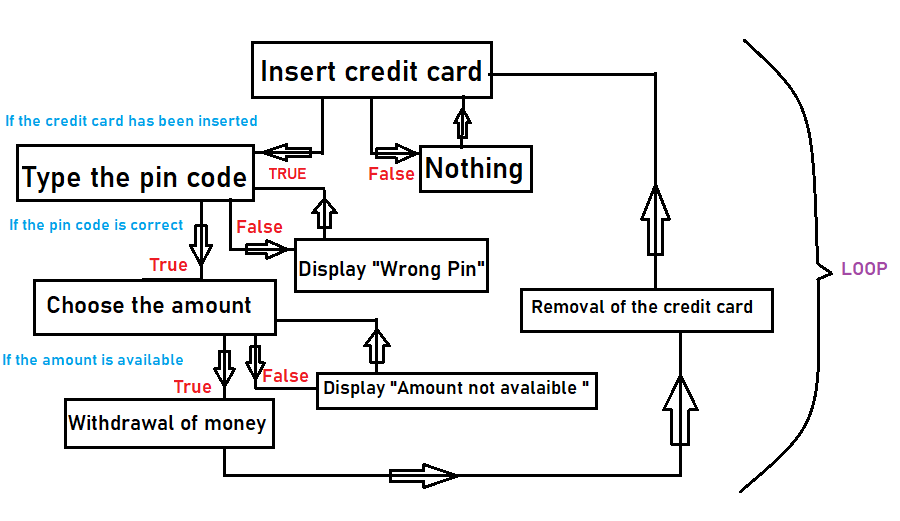
What can also be done is to graphically represent a concept with an example. Let's take the example of the bank to illustrate the "if... then" condition. Participants are asked to explain, using the "if... then" condition, how an ATM distributes money to us. The trainer will do the exercise with the participants, and then the participants will have to find an example on their own. Here is how to proceed: Insert the credit card. If card inserted, then go to the home screen and choose the amount. If there is enough money in the account, then go to the code verification step. If balance is not sufficient, decline and go back to select amount, etc...
Learn to code, code to learn. Why is coding so important. What is computational thinking?.
Let’s code!
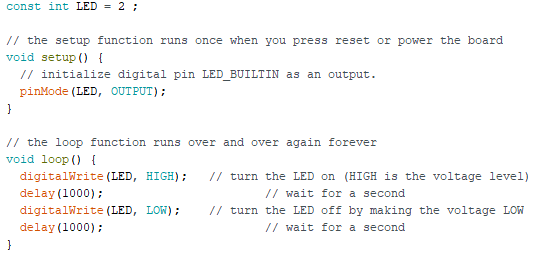
Now that we have popularized programming, the trainer will have to explain the basic functions and loops, as well as the syntax specific to Arduino. The basic language of Arduino is in C. Let's look at an example where we're trying to light an LED
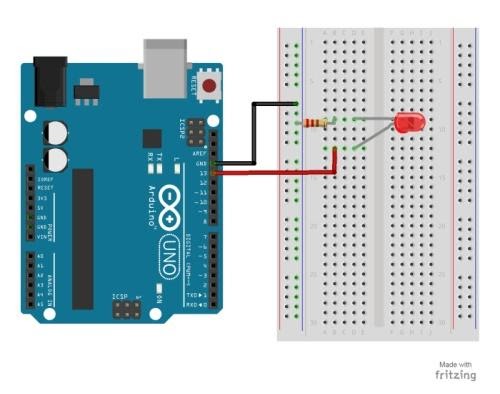
Here is the scheme:
Constants
Writing in programming: const int Now let's talk about the constants. Let's start from the premise that a computer cannot interpret sentences. Apart from the precise vocabulary as mentioned above, everything else will only be understood if a value is assigned. For example, if we connect a LED to digital pin 2, we will have to declare that LED = 2, so that our machine can understand that pin 2 is associated with the LED. These procedures are also mandatory so that we ourselves can understand our code. We write the name of the constants in capital letters (it's part of the programming conventions)

so you know that they are constants. The name of our constant (LED) is not written in blue because it is not a constant reserved for the IDE but for us. HIGH, LOW and OUTPUT are constants.
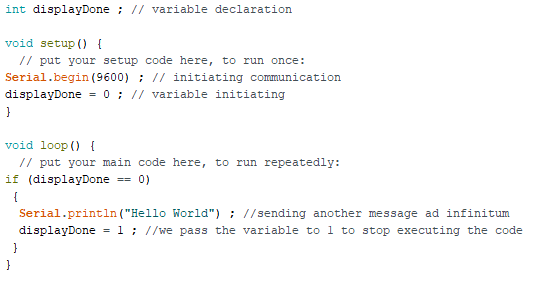
Variables
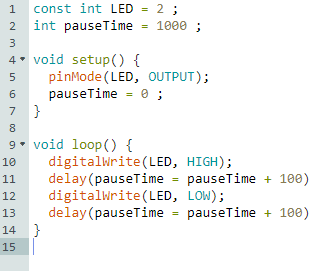
Writing in programming: int The variables look like constants, but the value will not remain fixed. When you declare a variable, the goal is to be able to change the value as you wish. For example, if between each line of code, you want to put variable pause times, you can integrate a variable named pauseTime. At first, it is necessary to declare the variable, but it is also necessary to give it a basic value, for example 0. For variables there is a nice, readable and above all conventional way of naming them: you write the name all attached and capitalize every word except the first one. Here is an example of a variable name: Let's take the example of the LED. If we want to increase the interval time between switching on

and off, it will be much easier to use one variable instead of writing everything one after the other. Note that even if the variable is declared with the term int (which means to integrate), there are a whole bunch of other terms depending on the value you want to assign. Here are the most important ones: Functions.
Functions
Writing in programming: int … { } Functions are pieces of code that are used so often that they are encapsulated in certain keywords so that you can use them more easily. Now, let's compare our function to the young child taken rather as an example. We're going to teach him how to make chocolate toast. We will try to detail as much as possible because he has never learned how to do it. Here is an example:
- Take the jar of chocolate from the cupboard
- Place the jar of chocolate on the table
- Open the jar of chocolate
- Taking a knife from a drawer
- Take a slice of bread from the bag of bread
- Dip the knife in the chocolate
- Remove the knife from the pot
- Spread the chocolate on the slice We can call this function: prepare a chocolate toast.
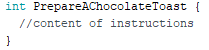
Void setup and void loop are both considered as functions.
Syntax in programming
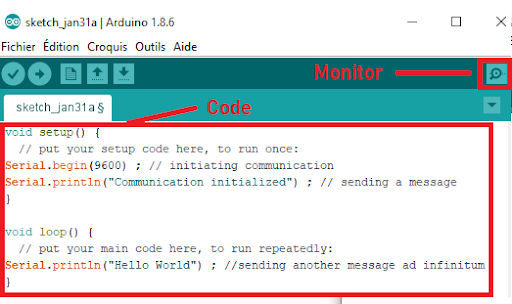
To fully understand synthax, nothing is better than analyzing an example. Let's start with one of the simplest programs, which consists in displaying in the monitor the message "Hello World". The monitor is used to communicate information about the program; it is located in the top right corner of the software.
Void setup() et void loop()
Let's analyze it together. First, we can notice the void setup function, where we will put all the initialization instructions. Let's compare this function to an airplane pilot. He will first have to check a lot of parameters before taking off, like the kerosene level or even the tire pressure. On every flight the pilot has to make sure that the parameters are correct. Now let's talk about the void loop. The content we'll put between the curly braces will repeat itself ad infinitum. Most of the content will go into this function.
Double slashes and slash star ( // ou / … / )
They are used to write comments. It's very important, even for a regular programmer, to describe everything you do. This makes the code readable for others, but also for oneself. Anything written after a double slash will not affect the code. Double slashes allow you to write a comment on one line, but if you want to write a comment on several lines or even make part of the code inactive without deleting it, you just have to open the comment with a / and close it with a /.
Brackets and curly brackets
Brackets and braces are paramount in programming. After each function, a brace to the right and then a brace to the left will be added. In these two braces we will put our instructions. The parentheses are placed after each line of code before the braces or the semicolon. In these brackets, we will put values that will form the parameters. Parameters are separated by commas if there is more than one. For example, in the Serial.begin (which corresponds to display the monitor on the Arduino software), it is written 9600. This means that the refresh rate is 9600 frames per second. Just at the bottom, in the Serial.print code line, we'll put the message we want to display in quotation marks in the brackets.
Conditions
The condition is a test that the program will perform by asking itself a question. If it can answer 'true' then it executes an action block (which will be put between braces), otherwise it does not execute it. Here is the corresponding pseudo code: program start if (test) { this code executes if we can answer true to the test. } the program continues
To illustrate the example, let's take again the program "Hello World", let's add a display condition.
You will notice that theSerial.println() statement displays the text in quotes and returns to the line. Modify the program using theSerial.print() statement by removing 'ln' at the end. You will see that the words stick together. So we retain that: Serial.println() : display with line break Serial.print() : displays without line break We notice that to test a value in a condition we put a double equal: ==
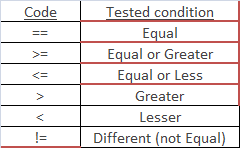
A beginner's error is to confuse the = which allows you to assign a value to a variable or constant, and the == which allows you to test equality.
The "for" loop
Programming allows us to make loops in a program. That is, we can execute a block of code several times before moving on to the next one. This repetition opens up a large number of possibilities. The for loop allows a code to be repeated a number of times known in advance. It's a bit like a condition: it starts with a keyword (for), followed by some things in brackets, then braces that contain the code to be executed. Here is an example: for (int t=0;t<10;t=t+1) { executable code }
The most difficult to understand is between the brackets. There are three important pieces of information separated by semicolons:
- Initialization of the variable that will be used as the counter. In our example, we declare and initialize (at the same time) a variable t of type "int":int t=0 .
- Condition to be tested to continue or not the repetition. In this case, the code is executed as long as t is less than 10: t<10.
- Action on the counter at each loop turn. In our case, t is increased by 1 at each pass: t=t+1.
Homework
Participants are asked to perform the following tasks:
- Taking the “Hello World” example or the LED one.
- Trying to modify parameters and see what’s going on.
- Based on the concepts we observed together, try to extend the code by adding a correlation between the two examples seen.
References
- Tutorial for Arduino.
- Getting started with Arduino.
- Arduino official Youtube.
- Youtube Arduino tutorial.
- OpenClassroom (French).
-
Carrying out Arduino projects through self-training
Learning Objectives
- Identify the benefits of the Arduino online community
- Encourage the sharing, reuse, and combination of code
- Foster learners’ collaborative learning
Join and benefit from the Arduino community
The last part will be the project part. The goal is that the participants will be able to build a project by themselves using Instructables or TinkerCad. Instructables is a community site that gathers more projects on Arduino than any other site. Just type Instructables in google, and on the magnifying glass, type the project you want to build. The instructions are extremely clear, and usually the code is explained at length. This is the biggest knowledge sharing community in terms of Arduino, Raspberry Pi, etc...
TinkerCad is a basic 3D modeling software, but some time ago, they integrated an additional Arduino tab, which shows us the diagram of the connections in an extremely precise way. Moreover, for each extension module, the code is already completely provided. The participants will only have to do the connections, copy/paste the code and possibly mix codes to correlate several modules. TinkerCad is surely one of the best tools available to get started on Arduino. You must connect to TinkerCad by creating an account, and click on the "Circuits" tab.
It is of course also possible to use the "Examples" tab on the Arduino IDE.
Homework
The homework will be to take one of the projects, and reach the goal of the first session: to be able to improve a project found on the Internet with the aim of lifehacking its own environment. This last homework will be part of the last exercise to make participants self-taught DIY enthusiasts!
References